After several years of slowly building up and then re-vamping this collection, currently my largest, I finally got the figures on the table last week. The game, a playtest of the Grimsby Club's "Corporal John and the Sun King" Marlburian rules, with some additions and amendments by yours truly, was fought out between old wargaming mate Dave Green and myself. Overall, it played pretty well, with only a couple of minor tweaks needed. As I mentioned in an earlier post, the rules are pretty old school - lots of dice throwing, simple and fun. I was a bit concerned that they might move a little too slowly, but in the event, we got a clear result in about 4 hours of actual play. Considering that Dave had 20 units plus guns to command (some 500 figures) and didn't know the rules, I thought that was none too bad.
One of the changes I did introduce, was to import a card-driven move system to try and bring a little uncertainty to the proceedings and that part worked a treat. Basically Dave and I had three infantry brigades and 3 cavalry brigades each. These brigades were each represented by a card. In addition each side had, what I have termed a "command card" and finally there were two "tea break" cards. The deck is shuffled each move and the cards drawn in sequence. If a brigade card is drawn, eg: Blue 4, that brigade is moved by the owning player. When BOTH tea break cards are drawn, that ends the movement phase, unless you have a command card, in which case, one brigade that has not yet moved may do so. Some moves all brigades on both sides managed to activate, on other moves, crucial units were unable to get going; this had quite serious consequences for me, when all three of my cavalry brigades failed to move at the same time.


The Dutch Guards and Murray's Scots, deployed in front of the village and were exposed to the full force of the French attack - no less than eight battalions! Both held on until over 50% casualties were taken, but were finally broken. Orkney's and North and Grey's English regiments on the extreme right flank also had a tough fight and were just about holding on at the end.
In the distance, the massed ranks of allied horse - seven regiments. In the end, this turned out to be my Achilles Heel!


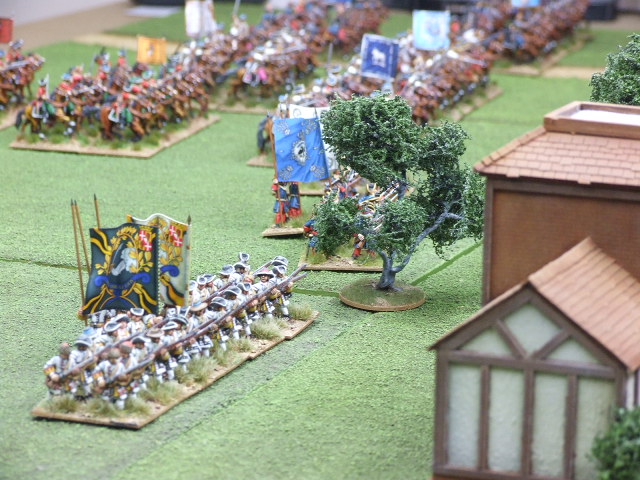
And this is why. Eight regiments of French horse which in a series of devastating melees utterly routed my cavalry. One regiment, the Bavarian Arco cuirassiers, seemingly left their swords sheathed in a collective act of Gandhi-like non-violence! Here are the miscreants walking the walk, supported by the Dutch Blue Guards, but failing to fight the fight.

Here are a few shots to illustrate the unfolding drama/disaster:


And the final endgame - sauve qui peut!!


Only a single regiment of English horse remained intact. Unfortunately the pursuing mass of French did not, as I had hoped, pursue my men off the table. Instead they rallied, wheeled and overwhelmed my last remaining troopers. Nothing remained but to retire from the field.
Here are a few shots of the infantry battle, which was hard-fought and bloody. Although the village remained in my hands, it became untenable after the total collapse of my left flank.


All in all, not a grand day for the Grand Alliance. Murray's regiment in particular fought well and died hard, but all for nothing. The Bavarians are on notice that a repeat of this performance will result in a one-way EBAY entry!
Nevertheless, a good game, which played quickly and entertainingly. The rules are undeniably enjoyable and the addition of the cards adds a much-needed touch of uncertainty. I look forward to the next one.
WOW! Fantastic spectacle and great pictures and figures. Love the look of the game. This is true Grand Alliance gaming. Like the card mechanic for the rules too. Can I get a copy of the original 'Corporal John...' rules somewhere?
ReplyDeleteOf course. Send me your email address and will forward you a copy.
Deletewould also be interested, always looking for the golden grail of WSS gaming
Deleteemail : alex underscore meyers at telenet dot be (translate words to characters)
thx
Hi Steve
ReplyDeletetry
ducdegobin@gmail.com
Rules sent. Hope they are of interest.
DeleteMany thanks for the rules Steve. How did you handle pikes in the game; I note that you have the stand deployed behind for the most part - so do you have a move option to deploy pikes when the battalia are threatened by cavalry etc?
ReplyDeleteNo problem. In the spirit of the rules I keep it simple. Pikes nullify the charge bonus if the unit is fully formed (useful v cavalry), but infantry only get 1 dice per 5 figures firing, rather than 4. I use a half stand (3 figures) of pikemen, simply to denote that the unit is armed with pikes (some aren't). I also use the same figures for WSS battles as the uniforms are essentially the same - two periods for the price of one! Obviously I leave the pike stands out then. Interested to know what you think of the rules - a bit different from FOB!!
DeleteStunning Steve.
ReplyDeleteThe one Allied victory of the four major battles in the 9YW and the miniature armies managed to lose it! The Allies definitely needed the real Corporal John on their side!
ReplyDeleteI see that you leave out the Pikes for WSS units, there is a lot of evidence that they were retained in several armies, including the English and Dutch, until well into the WSS.
I know - the shame of it!! I must confess that I am no expert on this period and there does seem to be some debate about the use of pikes in the WSS. They were not used in the main battles (Blenheim, Ramillies, Oudenaarde and Malplaquet) - again as far as I know - but I have heard that they were used in some of the more peripheral theatres such as Spain. Any further info always gratefully received. Info on the Nine Years' War is maddeningly scarce!!
ReplyDeleteThe pike question is a tricky one. I have a friend who is a "proper" historian (he writes books about this period), he says that British forces probably still carried them up until about 1707 and the Dutch till 1710, so may have been a few at Blenheim.
DeleteAs for 9YW, best source I have is John Child's book- good acounts of the 4 major actions, very detailed info about the many sieges and he deals at length with the logistics of the war, which were so important with the very large armies of the period. There are also bits in the Osprey book which is called something like " the Wars of the Sunking". My particular interest is the war in Ireland, which was an integral part of 9YW of course, and there are rather more published books on that aspect. All of my library and my wargaming armies are currently packed for a house move, but, from memory, there is a book about the Boyne, by McNally and I think John Childs has also written something on this aspect. The League of Augsburg do pdf uniform guides for the period as well.
I play these two periods in 10mm using Twilight of the Sunking rules from the Pike and Shot society. We did Neerwinden (massive game- played it over two weeks) and have also done Aughrim,
with The Boyne, Walcourt, Fleurus, and Steenkirk still to come, once I get reestablished in Scotland.
It is tricky. In general I try not to worry about it - use them for 9YW and not for WSS. Childs books are very good, but the lack of campaign and battle histories is a real miss. The wargaming is in a bit more of a vacuum than I am used to. Never mind, it still plays well. Still undecided over the rules though. Interested to see what Lily Banners 3 are like.
DeleteI,m enjoying your blog, Steve, I,ve just finished Spencer’s book on Blenheim. I,m becoming interested in this period and have Pike and Shotte rules plus Pikemans Lament. I,m interested in these Sun King rules but c,ant find them on the Grimsby Wargames site , if they are free can I also ask for a copy please.
ReplyDeleteSure. Just send me your email address
Delete